About 10 minute read
Seam Failures: The Most Common Single-Ply Roof Problem
Seam failure is the leading cause of leaks on
The failure mechanism, testing method, and repair approach differ significantly between membrane types. TPO and PVC rely on heat-welded seams where a machine melts the overlapping membrane edges and fuses them under pressure. EPDM relies on adhesive-bonded seams where a primer and seam tape or liquid adhesive create the bond. Modified bitumen uses torch-applied or self-adhered overlaps. Understanding how your specific seam type fails is essential for effective inspection and repair.
The good news: seam failures caught early are among the least expensive commercial roof repairs. A single seam repair costs $200-500 and takes less than an hour. The same seam left unrepaired for six months will allow water to saturate insulation, causing $5,000-15,000 in remediation costs. No other maintenance activity on a commercial roof offers a better return on investment than regular seam inspection.
How Heat-Welded Seams Work (TPO and PVC)
Heat welding is the standard seam method for thermoplastic single-ply membranes. A machine called a hot-air welder travels along the overlapping membrane edges, blowing heated air (typically 900-1,100 degrees Fahrenheit for TPO and 750-950 degrees for PVC) between the layers while a roller applies pressure to fuse them together. When executed correctly, the resulting weld is molecularly bonded — literally a single fused layer of material that is as strong as or stronger than the parent membrane.
The weld quality depends on four variables that the installer must control simultaneously. Temperature, speed, pressure, and surface condition must all be within specification. If the temperature is too low, the membrane does not achieve full fusion, creating a "cold weld" that can be peeled apart. If the temperature is too high, the membrane burns or thins at the seam, creating a weak point. If the speed is too fast, the heat does not penetrate fully. If the membrane surface is contaminated with dirt, moisture, or manufacturing release agents, the weld will not bond properly.
Weather conditions during installation have a significant impact on weld quality. Cold temperatures (below 40 degrees Fahrenheit) make it difficult to achieve sufficient heat penetration. Wind cools the membrane between the welder nozzle and the pressure roller, reducing effective weld temperature. Moisture on the membrane surface from dew, rain, or condensation creates steam that prevents bonding. Experienced TPO and PVC installers adjust machine settings throughout the day as temperature, wind, and sun exposure change — and they stop welding entirely when conditions fall outside acceptable parameters.
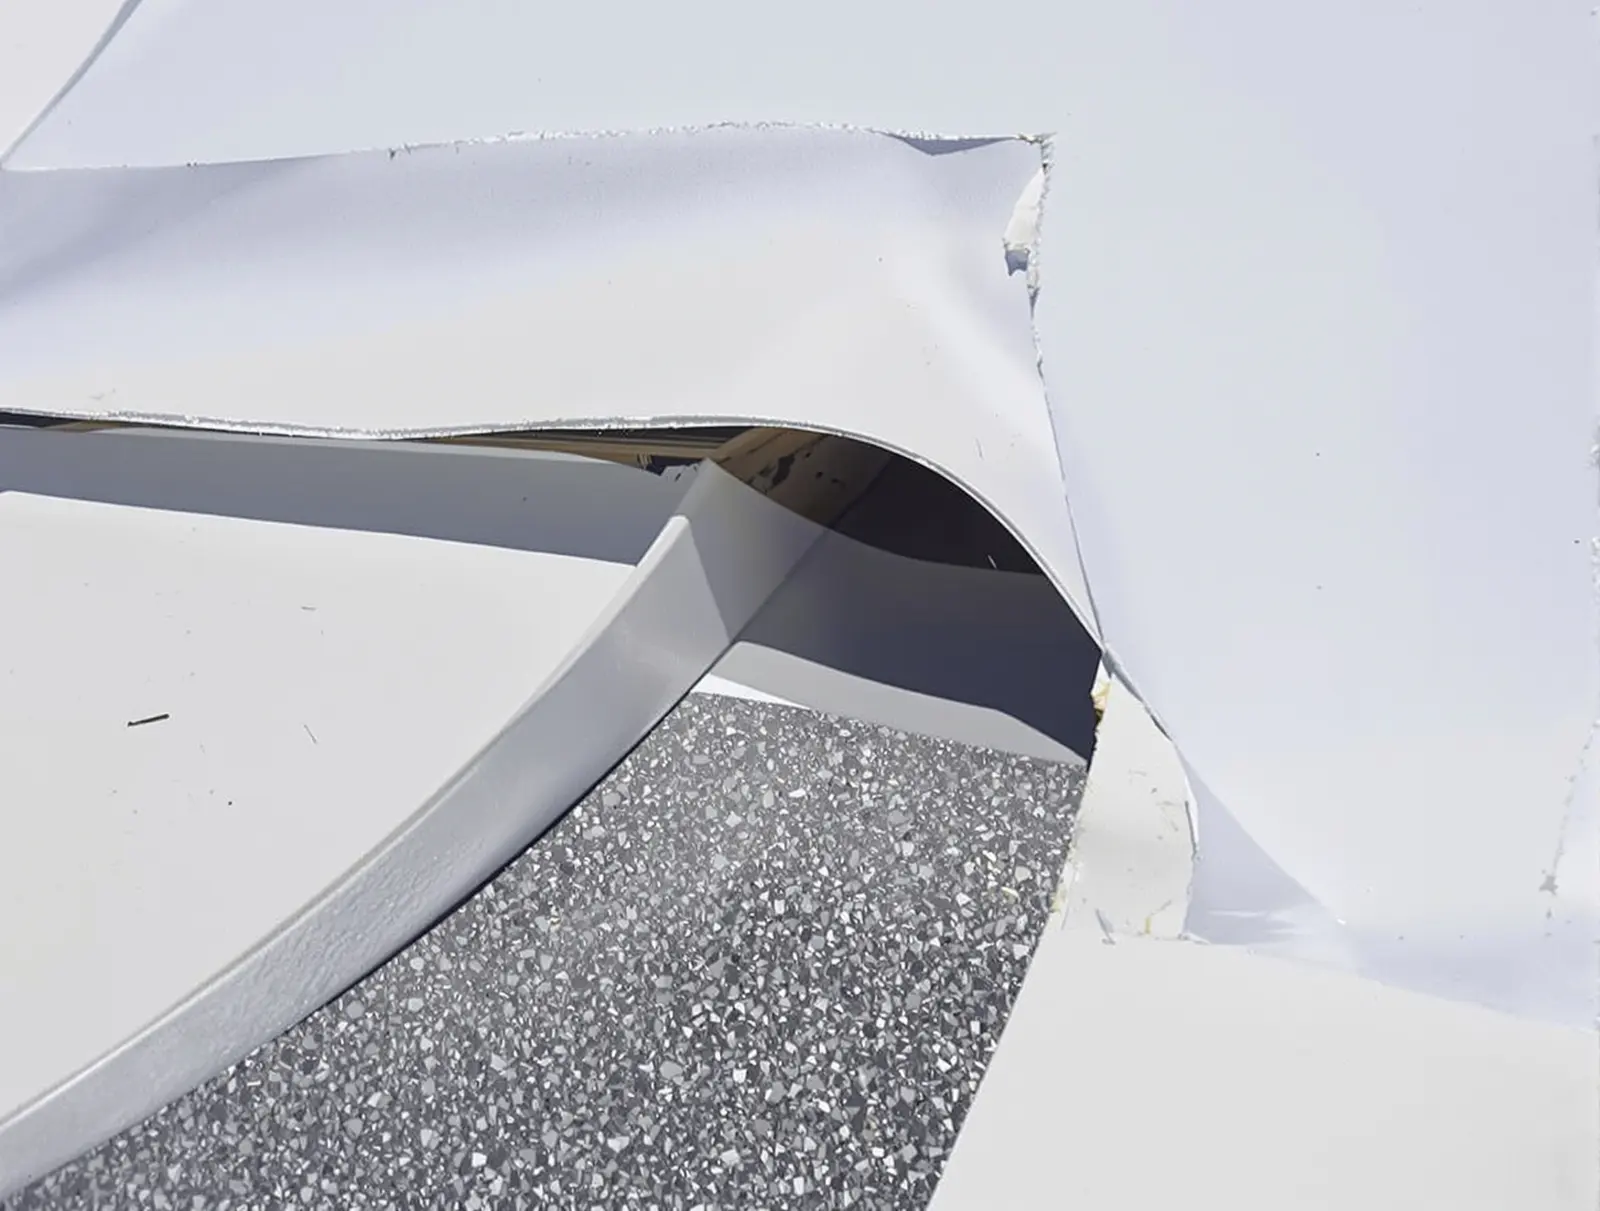
Common Heat-Weld Failure Patterns
- Fish-mouthing: The seam edge lifts away from the underlying sheet, creating a gap that looks like a fish's open mouth. This is the most common weld defect, caused by insufficient heat at the seam edge or by thermal contraction pulling the edge up after welding.
- Cold welds: The seam appears intact visually but separates easily under probe testing because the weld temperature was insufficient for full fusion. Cold welds are particularly dangerous because they can look acceptable during a visual inspection.
- Burn-throughs: Excessive heat thins or holes the membrane at the seam, creating a direct water entry point. This is more common with inexperienced welders or improperly calibrated machines.
- Partial welds: The center of the seam may be properly fused while one or both edges are unwelded. This occurs when the welder nozzle is not wide enough or is not centered on the overlap, leaving the outermost edge without sufficient heat.
How Adhesive Seams Work (EPDM)
EPDM membranes use adhesive-bonded seams because rubber cannot be heat-welded. The standard EPDM seam process involves cleaning both membrane surfaces, applying a liquid primer that chemically activates the rubber surface, positioning a seam tape (typically 3-inch-wide butyl-based adhesive strip) in the overlap, and rolling the seam with a steel roller to achieve full contact pressure. Some older EPDM installations used liquid contact adhesive instead of tape.
Adhesive seams are inherently less durable than heat welds over the long term. While a properly made EPDM seam can last 15-25 years, the adhesive bond degrades gradually from UV exposure at the seam edge, thermal cycling stress, and moisture exposure. Heat-welded TPO and PVC seams, by contrast, are a single fused material that does not have an adhesive layer to degrade. This durability difference is one of the primary reasons TPO and PVC have gained market share from EPDM over the past two decades.
The most common EPDM seam failure pattern is edge lifting. The exposed edge of the seam tape begins to peel away from the underlying membrane, starting at the most-exposed edge and progressing inward. Once the edge lifts, wind-driven rain can wick water under the tape, accelerating the bond failure. An EPDM seam that has begun to lift will not re-bond on its own — it requires cleaning, re-priming, and re-sealing with new tape or adhesive.
The Blunt Probe Test
The blunt probe test is the standard field method for evaluating seam integrity on any single-ply membrane. The test is simple, requires no specialized equipment, and provides immediate results. It should be part of every semi-annual roof inspection and is the primary quality assurance method used during new roof installations.
How to Perform the Test
Use a rounded, blunt-tipped tool — a capped screwdriver, a dedicated seam probe, or even the rounded end of a pen. The tool must be blunt to avoid puncturing the membrane. Draw the probe along the seam edge with moderate, consistent pressure — approximately the force you would use to write firmly with a pen. Travel the full length of the seam, paying particular attention to T-joints (where three membrane sheets meet), direction changes, and areas near penetrations or flashings where the welder must make tight turns.
The pass/fail criteria is zero tolerance. If the probe slides under the seam edge at any point — even for half an inch — the seam has failed at that location. There is no acceptable gap length, no "within normal limits" exception. A properly welded or bonded seam should resist probe penetration at every point along its entire length. Water only needs a pinhole to infiltrate, and during wind-driven rain, even a 1-inch defect can admit significant water.
What the Results Mean
- Probe cannot penetrate anywhere along the seam: The seam passes. Document this result and re-test at the next semi-annual inspection.
- One or two isolated locations where the probe penetrates: Isolated seam defect. Schedule a targeted repair ($200-500 per location). This is a maintenance finding, not a systemic problem.
- Multiple defects along the same seam: That seam needs to be re-welded or re-bonded along its full length. The cost is typically $8-15 per linear foot. Inspect adjacent seams for similar defects.
- Widespread defects across multiple seams in different areas: This indicates a systemic problem — either an installation defect affecting the entire roof or a membrane that has degraded to the point where seam integrity is failing broadly. This finding warrants a comprehensive roof evaluation by a qualified contractor or consultant.
When Seams Can Be Repaired
Isolated seam failures on an otherwise healthy roof are straightforward repairs with excellent outcomes. The repair method depends on the membrane type:
TPO and PVC Seam Repair
A qualified roofer re-welds the failed section using a hand-held hot-air welder. The seam edge is cleaned, heated, and rolled to create a new weld. If the original weld is too degraded for a simple re-weld, a membrane cover strip (typically 6 inches wide) is welded over the defective area, creating a secondary waterproof layer. Cost: $200-500 per repair, typically completed in under an hour.
The repair must be performed by a technician experienced with heat welding. Improper welding temperature or technique can damage the membrane further. The repairing technician should probe-test the repair after completion to verify a full seal.
EPDM Seam Repair
EPDM seam repair involves cleaning the failed area, applying primer to both surfaces, and re-bonding with new seam tape or liquid adhesive. The critical step is surface preparation — EPDM rubber must be cleaned with a manufacturer-approved solvent to remove contamination and oxidation, then primed with a compatible primer that reactivates the rubber surface for bonding. Skipping or rushing the cleaning and priming steps is the most common cause of failed repairs.
Generic caulks and sealants are not acceptable EPDM seam repairs. Building owners and maintenance staff sometimes apply silicone or polyurethane caulk to a lifting EPDM seam edge as a quick fix. These products are not chemically compatible with EPDM rubber, do not create a lasting bond, and peel away within months. Worse, the residue they leave can contaminate the surface and make a proper repair more difficult when the caulk inevitably fails.
When Seam Failures Signal System-Wide Problems
The pattern of seam failures tells you more than the individual failures themselves. An isolated defect is a maintenance item. A pattern of failures is a diagnosis. Learning to distinguish between the two prevents both under-reaction (ignoring a systemic problem) and over-reaction (replacing a roof that only needs targeted repairs).
Indicators of an Installation Defect
Seam failures that appear within the first 5 years across multiple areas suggest an installation quality problem. The membrane itself may be in excellent condition while the seams are failing because the welding equipment was improperly calibrated, the crew was inexperienced, or welding occurred in unsuitable weather conditions. If your roof is under an NDL warranty and is showing widespread seam failure within the warranty period, contact the manufacturer — this is exactly the type of defect that NDL warranties are designed to cover.
Indicators of Membrane Degradation
Seam failures appearing after 12-15+ years, particularly when accompanied by membrane chalking, cracking, or loss of flexibility, indicate the membrane has reached the end of its service life. At this stage, repairing individual seams becomes increasingly futile because the membrane between the seams is also degrading. Each repair addresses one failure while new failures develop elsewhere. When seam repairs are needed more than twice per year on the same roof, it is time to evaluate replacement rather than continued patching.
Indicators of Environmental Stress
Seam failures concentrated in specific zones — perimeter edges, corners, or areas near rooftop equipment — suggest environmental stress rather than system-wide failure. Perimeter seam failures may indicate the membrane is under-fastened for the wind loads in that zone. Seam failures near equipment may result from vibration, chemical exposure, or thermal stress from exhaust. Zone-specific failures can often be addressed with targeted repairs and modifications to the stress source, without replacing the entire system.
Seam Failure Costs: Repair vs. Replacement Math
Understanding the cost comparison helps you make rational decisions about when to repair and when to replace. The economics are straightforward: when the cumulative cost of seam repairs approaches 30-40% of the cost of a new roof, replacement becomes the better investment because a new system provides 20+ years of warranty protection while repairs only address the current failures.
- Individual seam repair: $200-500 per location. Cost-effective when failures are isolated and infrequent (fewer than 2-3 per year).
- Systematic seam repair campaign: $8-15 per linear foot when a contractor addresses all seams in a defined area. Appropriate when multiple seams in one zone need attention but the rest of the roof is sound.
- Full re-roof: $5.50-12.00 per square foot depending on the system. The right decision when seam failures are widespread, the membrane is degraded, and ongoing repairs are only buying time at increasing cost.
Track your seam repair costs over time. Maintain a spreadsheet or log that records each repair date, location, cost, and the name of the contractor who performed the work. This repair history is the most objective tool you have for deciding when the repair-vs.-replace tipping point has arrived. It also supports warranty claims and provides your next roofing contractor with valuable information about the system's condition history.
Prevention: Extending Seam Life
Semi-annual probe testing is the most effective seam preservation practice. Catching a seam defect when it is 3 inches long and repairing it immediately prevents the 3-inch defect from becoming a 3-foot failure during the next wind event. Test a representative sample of seams during each inspection — all perimeter seams, all seams near penetrations and equipment, and a random selection of field seams. A thorough seam inspection on a 20,000-square-foot roof takes an experienced inspector 1-2 hours.
Keep seam edges clean and free of debris. Dirt, gravel, and biological growth that accumulate along seam edges can trap moisture and accelerate adhesive degradation on EPDM systems. On TPO and PVC systems, debris accumulation along seam edges can mask developing failures, preventing early detection. Include seam edge cleaning as part of your semi-annual roof maintenance protocol.
Address ponding water that contacts seams. Seams that sit in chronic ponding areas degrade faster than seams in dry areas. Ponding water keeps the seam edge perpetually wet, promoting adhesive breakdown on EPDM systems and accelerating surface degradation on TPO systems. If you have ponding that covers seam areas, prioritize the drainage correction — it protects both the seams and the membrane field.
Frequently Asked Questions
What causes seam failures on TPO and PVC roofs?
The primary causes are improper welding temperature, contaminated membrane surfaces, welding in unsuitable weather, and excessive welding speed. Cold welds from insufficient temperature are the most common installation defect. Over time, thermal cycling stress from daily and seasonal temperature changes can also weaken welds that were marginal at installation. Manufacturing defects in the membrane formulation — though rare — can cause premature seam degradation across an entire production run.
How do you test a flat roof seam?
The blunt probe test is the standard field method. Draw a rounded, blunt-tipped tool along the seam edge with moderate pressure. If the probe can separate the membrane layers at any point, the seam has failed at that location. The test should be performed during every semi-annual roof inspection and is part of the quality assurance process during new installations.
Can a failed seam be repaired, or does the roof need replacement?
Isolated failures can be repaired effectively for $200-500 per location. TPO and PVC seams are re-welded with a hand-held hot-air welder. EPDM seams are cleaned, primed, and re-bonded with new tape. When seam failures are widespread — appearing across multiple areas of the roof — they indicate either an installation defect (potentially a warranty claim) or membrane degradation at end of life (replacement is likely needed).
How much does it cost to repair a seam failure?
Individual repairs cost $200-500 per location. Systematic seam repair campaigns covering multiple seams are typically priced at $8-15 per linear foot. These costs include cleaning, preparation, re-welding or re-bonding, and verification testing. EPDM repairs at the lower end, TPO and PVC at the higher end due to the heat welding equipment and skill required.
Are EPDM seams more prone to failure than TPO or PVC seams?
Yes, adhesive-bonded EPDM seams are generally more vulnerable over time than heat-welded seams. Heat welding creates a molecular fusion that does not have a separate adhesive layer to degrade. EPDM adhesive bonds weaken gradually from UV exposure, thermal cycling, and moisture. This is why EPDM roofs require more frequent seam inspection — and why TPO and PVC have gained significant market share based partly on the long-term reliability advantage of heat-welded seams.